What's Christmas dinner without dessert, even for us candida folks? My dessert uses some of the trail mix I talked about in my first post about by Christmas dinner menu at http://catsinthekitchen.blogspot.com/2010/12/anti-candida-christmas-dinner.html. It also makes use of my favorite vanilla tea smoothie recipe at http://catsinthekitchen.blogspot.com/2010/09/sleepytime-vanilla-tea-smoothie-acd.html.
I simply whipped up some of this smoothie in the morning and poured it into a freezer-safe container. I stored it in the freezer all day and took it out in the evening. After thawing it out slightly, I spooned it into my food processor and blended it on high into an soft-serve ice cream consistency. It really does resemble soft-serve ice cream.
Spoon this frozen dessert into a ice-cream dish and top off with a tablespoon of trail mix and voila: dessert for anti-candida me!
Merry Christmas everyone!
Friday, December 24, 2010
Family Recipe Friday - Holiday (or Anytime) Prune Bread
Family Recipe Friday – is an opportunity to share your family recipes with fellow bloggers and foodies alike. Whether it’s an old-fashioned recipe passed down through generations, a recipe uncovered through your family history research, or a discovered recipe that embraces your ancestral heritage share them on Family Recipe Friday. This series was suggested by Lynn Palermo of The Armchair Genealogist.
I am not sure when this tradition got started or where the recipe came from, but my family has been making and giving prune bread as gifts at Christmas for some time. Maybe this does not sound appetizing to some, but this is a really tasty quick bread. I am making three loaves this morning. Here is the recipe
1 cup uncooked prunes
1 cup water
1 cup sugar
3/4 cup shortening
3/4 tsp cinnamon
1/4 tsp ground cloves
1/2 tsp nutmeg
1 egg beaten
2 cups flour
2 1/2 tsp baking powder
Cut prunes into small pieces. Add shortening, water, sugar and spices to prunes and boil for 15 minutes. Cool. Stir in egg, flour sifted with baking powder. Pour batter into a greased and floured loaf pan. Bake at 350 degrees F for 45 minutes. Let cool in pan for 10 minutes before removing from pan.
© 2010, copyright William C. Haskell
Advent Calendar Day 24 - Christmas Eve
Prompt for December 24 – Christmas Eve
How did you, your family or your ancestors spend Christmas Eve?
Christmas shopping! And wrapping presents. Well, sometimes. We did not do much different on Christmas Eve while I was growing up. Mostly we spent time preparing for Christmas day - cooking, last minute shopping, wrapping, making, etc. Once I got married, we celebrated Christmas Eve with my wife's family with a mid-afternoon meal and then opening presents around the Christmas tree.
I don't have any information on how any of my ancestors spent Christmas Eve.
Happy Holidays, Everyone!
image source: http://www.openclipart.org/browse |
© 2010, copyright William C. Haskell
Thursday, December 23, 2010
Anti-candida Christmas dinner continued
The mock mashed potatoes came out oh so yummy. I'd say better than real mashed potatoes. The combination of rutabagas and cauliflower had a almost sweet taste which made the lack of butter unnoticeable.
I will serve this side dish as part of my candida Christmas dinner. Get the full menu in my previous post at
http://catsinthekitchen.blogspot.com/2010/12/anti-candida-christmas-dinner.html.
Here's the recipe I created for Mock Mashed Potatoes
Ingredients:
• 1 head of cauliflower, washed, trimmed and chopped into pieces.
• 3-4 medium rutabagas, washed, peeled and cut into one-inch pieces.
• Chicken broth
• Hemp milk or other alternative dairy beverage
• Salt and pepper
Directions:
• Bring water to a boil in two large saucepans. You will need to cook the two veggies separately since the rutabagas will take longer to cook.
• Add a sprinkle of salt to each pot.
• Put the rutabagas in one pot and the cauliflower in the other.
• Cook until each is fork tender.
• Drain both cauliflower and rutabagas.
• Combine the two veggies in a large pot.
• Add a bit of chicken broth, milk of your choice, salt and pepper.
• Start the mashing process with a potato masher.
• Add more liquids if needed.
• Finish whipping with a hand mixer.
• Taste and add more salt and pepper if needed.
There's one more recipe to practice: the mock vanilla ice cream topped with trail mix. That will be tomorrow.
How to Style and Photograph Food
Please welcome our guest couple, Carrie and Andrew Purcell, from Pictures & Pancakes.
When styling food we really try to keep things natural and not too fussy. There are definitely some tricks used in food styling but we hardly ever use those for the blog – we want it to feel real and like what you’d be served for a meal in our home! The only things that I use for the blog that I use when styling for editorial or advertising clients are my q-tips, tweezers and paint brush – all used for tiny details like picking off a stray piece of parsley or moistening dry meat with a little water or oil. And we definitely eat everything we shoot!
We have a cupboard full of props and are always adding to the collection. Whenever we’re in home or kitchen stores and see a bowl, napkin or spoon that we love, we pick one up knowing it’ll be put to good use helping the food look pretty for our readers. Some of our favorite places in NYC to shop for props are Global Table, Fishs Eddy, ABC Home, Ochre and all the different flea markets around town. We love collecting things when we travel as well.
With photography, and more specifically food photography, we really try and keep the food the hero. With the blog, it's really about the recipe, so we want the photo to obviously be beautiful, but also let the food have the best light it can. On our end, we almost use all natural light, using a few reflecting cards to bounce some light in and lessen the contrast. We also like to use a fairly shallow depth of field, something that we think adds to the mood and feel of the shots. But really, most of all shooting food is about the balance of your perspective and the foods perspective, keeping the food the main hero, but also letting your individual style come through.
Wednesday, December 22, 2010
From My Kitchen To Yours...
Ok just one more cookie! At the last minute I caved in and made some Cucidati, I wasn't going to make them at all this year but I was slightly coerced by my brother-in-law and husband who were giving me a guilt trip.
Cucidati are traditional Italian fig cookies very popular at Christmas time consisting of a tender dough that wraps around a thick and flavorful filling of figs, raisins, almonds, orange peel and a few other things that are laced with brandy and warm spices.
On a cold winter day my house quickly warmed up with the scent of cucidati baking in the oven. I don't know what I was thinking, it just wouldn't be the same without a few of these gracing our table!
In the end I made two people very very happy that day, and isn't that the
real reason why we cook anyway?
Here's my favorite recipe.
I want to take this time to wish each and everyone of you a most delicious holiday filled with lots of love and happiness!
From my kitchen to yours,
Marie
Anti-candida Christmas dinner
The anti-candida diet has become so much a part of me that it seldom bothers me to sit across from someone eating desserts or bread or other carb-loaded foods. That is until the holidays roll around. Then, it starts to bother me again. All the traditional Christmas foods are paraded in front of me via advertising, parties, etc.
It's hard to not feel a bit resentful but this year, I've planned a counterattack because I want to stay as mellow as my cat, Pumpkin, sleeping under the Christmas tree in the photo above. I've carefully planned and even tried the recipes for my anti-candida Christmas dinner. Here's what I have planned for dinner:
If you like cranberries a lot, it's a good idea right now to grab a few extra packages while they are cheaper and available, and stow them in the freezer. Here's the procedure/recipe I followed for drying cranberries.
Drying cranberries
This is super easy. Just toast some pumpkin and sunflower seeds either in a heavy skillet on the stovetop, or in the oven on a baking sheet at 325 degrees. I prefer the stovetop because I can monitor them more carefully. I start by spraying the pan with pan spray and dumping in one cup of each type of seeds. Spread the seeds around; spray with additional pan spray to coat; and salt to taste. Toast the seeds on medium heat until they begin to pop.
Allow the seeds to cool before mixing with 2 T. dried cranberries and 2 T. cacao bits. Store in the freezer to keep yourself from nibbling.
The mashed cauliflower/rutabaga mixture is my project for tonight. Post, directions and picture coming.
It's hard to not feel a bit resentful but this year, I've planned a counterattack because I want to stay as mellow as my cat, Pumpkin, sleeping under the Christmas tree in the photo above. I've carefully planned and even tried the recipes for my anti-candida Christmas dinner. Here's what I have planned for dinner:
- Appetizer: cucumber slices, red pepper triangles and other raw veggies with chickpea dip.
- Salad: mixed greens or spinach with dried cranberries and avocado.
- Entree: roasted free-range turkey.
- Sides: mashed rutabaga/cauliflower blend; roasted brussel sprouts; green beans.
- Dessert: ACD-safe vanilla frozen dessert topped with trail mix (cacao bits, pumpkin and sunflower seeds, dried cranberries).
If you like cranberries a lot, it's a good idea right now to grab a few extra packages while they are cheaper and available, and stow them in the freezer. Here's the procedure/recipe I followed for drying cranberries.
Drying cranberries
- Place one bag of fresh or frozen cranberries into a pot with water. Bring the cranberries and water to boil.
- Allow the cranberries to sit in the water long enough to burst. Drain the water from the cranberries. Add stevia (either liquid or powder) and toss to coat the cranberries.
- Spread the cranberries on a baking sheet. Place in the freezer for at least two hours. The instructions I followed indicated that cranberries dehydrate faster when frozen first. It still took a long, long, long time.
- Place the cranberries onto a sheet in a food dehydrator. Allow to dehyrate for 12+ hours. Begin checking after 10 hours to remove the ones that are dry. Note: You could dry the cranberries in your oven as well at 250 degrees.
- Store the dried cranberries in a container in the freezer until ready to use.
This is super easy. Just toast some pumpkin and sunflower seeds either in a heavy skillet on the stovetop, or in the oven on a baking sheet at 325 degrees. I prefer the stovetop because I can monitor them more carefully. I start by spraying the pan with pan spray and dumping in one cup of each type of seeds. Spread the seeds around; spray with additional pan spray to coat; and salt to taste. Toast the seeds on medium heat until they begin to pop.
Allow the seeds to cool before mixing with 2 T. dried cranberries and 2 T. cacao bits. Store in the freezer to keep yourself from nibbling.
The mashed cauliflower/rutabaga mixture is my project for tonight. Post, directions and picture coming.
Pecan Rolls
Our family's traditional Christmas breakfast, these Pecan Rolls are probably actually Schnecken from Germany. However, as pecans are native to America, these have been Americanized.
We have one pan on Christmas morning and I freeze the other to thaw and warm for New Year's breakfast. A sweet start to the new year, right?
These are simple and the result is impressive. The only thing you need to have plenty of is time as the recipe is a fairly forgiving one.
It originally came from the Meta Given's Modern Encyclopedia of Cooking which was my mother's go-to book for many recipes that became family favorites ... such as the Tuna Puff Log. Yes, it sounds strange but it was a brioche loaf which one baked and then cut off the lid to in order to hollow out and fill with a delicious creamed tuna (fairly stiff but with walnuts and a dash of nutmeg). It made a surprisingly sophisticated dish which I seem to recall my parents serving to company ... who would eat seconds.
I have adapted the dough recipe for this somewhat to modernize it and I divided it into steps to make it easier to follow. I also simplified it as I am used to kneading yeast breads, etc. But the rest is pure Meta Given.
Pecan Rolls
Step 1:
1/3 cup butter, melted
1 cup warm milk
1 egg, lightly beaten
1/3 cup sugar
1 teaspoon salt
1 tablespoon yeast (or 1 package yeast)
1/2 teaspoon malt powder (optional, I get it from King Arthur flour, not in the original recipe)
4 cups flour
Combine and knead as usual for yeast dough. Let rise. Punch down dough, turn out on a lightly floured counter and let rest 10 minutes.
Step 2:
1-1/3 cups moist light brown sugar
1/2 cup butter, room temperature
1/4 cup white corn syrup
Pecan halves or pieces
Meanwhile, mix brown sugar, butter and corn syrup until smooth and spread in the bottom of two 9” cake pans. Place pecan halves (upside down) in circles covering pan spread. If using pieces, press enough cover thoroughly firmly into mixture. Set pans aside until after rolls have been made.
Step 3:
1/2 cup soft butter
1/2 cup white sugar
1 teaspoon cinnamon
Roll half of dough into a 8x10” rectangle, about 1/3” thick. Spread with butter and sprinkle with sugar mixed with cinnamon. Starting on wide side, roll up snugly. Cut into twelve 1” slices. Place into one pan in circles, with rolls not quite touching. Brush with melted butter. Repeat with remaining dough. Cover lightly and let rise in warm place until double, about 1 hour.
Bake at 350° for 25-30 minutes.
Remove from oven; let stand 2-3 minutes, then loosen edges with a knife and turn upside down onto serving plate. Hold pan over rolls a minute for syrup to drain out on rolls. Serve warm nut-side-up.
These freeze well. Dough can be used for any sweet rolls.
Christmas Baking
I kicked off the baking season, as I always do, with a batch of Amaretti. Those little almond meringue cookies that are so easy to make and even easier to eat.
Next were Date Crumb Bars ... think homemade "Fig Newton" for these.
Then I stalled out ... luckily Rose came home and with everyone at work has time enough to take up the slack.
She began with some Chocolate Chunk Biscotti, which are so much easier to make than most people would ever credit.
Next up were Chocolate Mint Filled Cookies. This recipe basically is a chocolate sandwich cookie with a chocolate mint patty as filling. I had some Andes' chocolate mint chip-ish bits and she used those for the filling instead of the thin mint patty. They are good enough but not minty enough and next year we will go back to the standard way.
Of course, we can't forget Mexican Wedding Cakes, which are amazingly, buttery, nutty bits of goodness with just the slight sweetness that comes from a powdered sugar coating.
Peanut Butter Bears (which I can't believe I never shared here ... must fix that soon). They are a delicious, crisp peanut butter cookie that has a texture reminiscent of shortbread somehow. This year we figured the girls are finally old enough not to care about making bears of the dough and Rose added chocolate chips and rolled them into balls which she flattened with her hand. Delicious!
Last up will be sugar cookies, cut into various Christmas shapes, of course, and then frosted in a Christmas Eve family decorating marathon. I am still searching for that holy grail of sugar cookie recipes so tend to try a different one every year in my quest for perfection.
That isn't all the baking though.
Last weekend I made Mashed Potato Dinner Rolls and put them in the freezer awaiting thawing for their Christmas dinner debut.
On Christmas Eve I will make Pecan Rolls, which was our family's traditional Christmas morning breakfast all through my youth. There is nothing like eating those rolls and ripping open gifts while the paper sticks to your hands because of the cinnamony syrup. Mmmm, mmmm. I never realized until now that I have neglected to share it with y'all. Enjoy!
Wordless Wednesday (Almost) - Typical Japanese Shop
My grandfather, Merrill Haskell, was on his way back from Vladivostok, Russia in February 1920 and stopped at Kyoto, Japan. This photograph was labeled "Typical Japanese Shop, Kyoto Feb. 1920"
© 2010, copyright William C. Haskell
Tuesday, December 21, 2010
Baked Camembert
Usually my cheese posts are concerned with the cheese as its own entity but this post is a little bit different. I'm going to take a rather commercial cheese, in this case the South Cape Mini Camembert
and turn it into a molten case of cheesy goodness!
There's nothing wrong with South Cape Camembert - it isn't in the league of say a Jindi Triple cream but not everyone can afford that cheese - but you can turn it into something that is a little bit nicer.
The first step to slice off the top - ideally you'll cut it fine enough to just remove the rind.
The second step - sprinkle the surface with fresh herbs - here I've used rosemary, thyme, sage, oregano, finely sliced garlic and the Chilean spice called Merken - smoked paprika or chilli powder would work quite nicely too.
Place the top back onto the cheese and then wrap the whole lot tightly in baking paper - then wrap this parcel in foil. Place in an oven-proof dish that will snugly hold it and bake in a low oven until the cheese has softened - anywhere from 15 to 30 minutes.
At this stage it is quite fragile as the cheese is molten - let it rest for a minute or two before removing.
Slide it carefully onto your cheese board - remove the lid and voilĆ you are done.
To serve, I've matched it with fresh olive bread - sourdough would also work as its slightly acidic nature would complement the rich cheese.
All Rights Reserved ©Haalo. For personal non-commercial use only - this feed may not be republished.
Buttermilk Cheddar Biscuits
My regular readers will know how much I enjoy making various types of biscuits. My latest attempt were these moist Cheddar Biscuits with a golden brown top. Savory biscuits such as these ones make a nice treat for lunch and an ideal accompaniment with most any meal and would certainly be a welcome addition to the Christmas table. Easy to prepare and very filling, the only drawback is the amount of dishes and clean up after you are done baking, but I can assure you it's worth the effort. If you don't have buttermilk on hand, simply add 1 tablespoon of vinegar or lemon juice to a measuring cup and add enough milk to measure 1 cup. Let sit for 5 minutes. Any remaining soured milk that is left over will keep in the fridge for three or four days.
Quick and Easy Ricotta Cheese Biscuits
Cheddar Dijon Biscuits
Olive Oil Parmesan Biscuits
Lime Biscuit Thins
On the top of the reading stack: Mysteries by Knut Hamsun
Audio Accompaniment: Translucence/Drift Music by John Foxx and Harold Budd
Buttermilk Cheddar BiscuitsMore biscuit recipes from Lisa's Vegetarian Kitchen:
2 cups of unbleached white flour
1 tablespoon of baking powder
1/2 teaspoon of sea salt
1 1/2 sticks of unsalted butter (12 tablespoons)
1/2 cup of buttermilk (or soured milk)
1 large egg
1 cup of extra old white cheddar cheese, grated
1 egg beaten, for brushing the tops of the biscuits before they go into the oven
Line a baking sheet with parchment paper.
Combine the flour, baking powder, and salt in a large bowl. Cut the butter into the mixture with a pastry cutter or a knife and fork until the butter is reduced to small crumbs. Gently whisk together the buttermilk and egg in a small bowl and pour into the dry ingredients. Mix until just combined. Fold the cheese into the mixture.
Turn the dough out onto a floured board and gently knead 5 - 7 times. Roll the dough out into a rectangle, roughly 10 x 5 inches (the thickness should be 3/4 of an inch). Cut the dough lengthwise in half and then across in quarters into you have 8 squares. Transfer to the prepared baking sheet and brush the tops with the beaten egg.
Bake in a preheated 425 degree oven for 20 - 25 minutes, or until the tops are nicely browned and the biscuits are baked throughout. Cool on a wire rack and serve warm or hot.
Yields 8 biscuits.
Quick and Easy Ricotta Cheese Biscuits
Cheddar Dijon Biscuits
Olive Oil Parmesan Biscuits
Lime Biscuit Thins
On the top of the reading stack: Mysteries by Knut Hamsun
Audio Accompaniment: Translucence/Drift Music by John Foxx and Harold Budd
Current Research - Haskell, Holbrook and Goodhue lines
I am currently documenting and sourcing birth, marriage and death dates for my Haskell, Holbrook and Goodhue ancestors and their spouses and children. Since I am a member of the New England Historic Genealogical Society (NEHGS) , I am taking advantage of their online databases at www.americanancestors.org. Their website was updated and enhanced earlier this fall and it is one of my favorites for online research. Since many of my ancestors are from Massachusetts, I have been using the Massachusetts Vital Records to 1850 database a lot. This is incredibly handy and saves me a great deal of time from having to travel to a library that has hard copies of the Massachusetts Vital Record books. I start out using the advanced search, but if I cannot find my ancestor that way, then I can view the scanned pages of the original records and scroll through page by page to see if I can find the person that way. This works well, especially since some of the names had interesting spelling variations. I have a lot of information that was compiled by my grandmother, so I generally have a good idea of where the specific event took place for many of my ancestors.
I have also been having success with some more recent ancestors in the Massachusetts Vital Records 1841 - 1910 and 1911 - 1915 databases. Both of these databases also have scanned copies of the original records.
If you are not a member of NEHGS, I highly recommend joining to take advantage of these great online databases.
© 2010, copyright William C. Haskell
Advent Calendar Day 21 - Christmas Music
Prompt for December 21 – Christmas Music
What songs did your family listen to during Christmas?
We listened to it all. Some of us even played it. I liked playing Christmas carols on my trumpet and sometimes on the piano, although I was not very good on the latter. As I noted in an earlier post, my Mom enjoyed Amahl and the Night Visitors which we had on a record.Did you ever go caroling?
I remember going caroling the first year we had moved to New Gloucester and one neighbor came out with a gun. They never had carolers before and were suspicious. We became good friends with those neighbors after that. We only had three neighbors that lived close enough to walk to, so I don't remember going caroling very often.Did you have a favorite song?
I like them all but if I have to choose, then I would say "Hark! the Herald Angels Sing".© 2010, copyright William C. Haskell
Monday, December 20, 2010
Cardamom Biscotti...
We haven't made biscotti in quite some time - I was planning on making a couple different batches for the holiday packages, but we already had a ton of items to make and we frankly ran out of time before they had to go out! Now that we're settling down and Jeff is recovering from his neck surgery (see below!), I found time to crank out this Cardamom Biscotti for me to snack on.
Most biscotti are pretty flexible with adaptations - for these, we went with all-purpose flour, cut with a bit of whole-wheat pastry flour, and ground almonds for a hint of nuttiness. While you could use already ground cardamom, you might want to up the amount as it tends to be less intense than freshly ground. We ground our cardamom fresh for the most gusto, taking the tiny seeds out of their green shells and crushing them with our mortar and pestle.
With a little baking powder for lift and salt to balance the sweetness, granulated sugar joins the dry mixture and the whole shebang is simply brought together with a couple eggs and a heavy splash of vanilla.
Shaped into a log (try to use as little extra flour as possible), the dough is placed on the baking sheet and gently flattened to help the biscotti spread evenly as it bakes. Interestingly enough, instead of coating the dough with a beaten egg white and sugar before baking, this recipe calls for taking the loaf out more than halfway through baking to be coated then. Why? I'm not all that sure, but I followed along and it seemed to work out well.
I didn't want to fudge with the sugar-y crust that had been created on the loaf by spritzing it with water as we typically do with biscotti, so I skipped that process this time. While I don't think it suffered much, the loaf did crumble slightly more than it would have if we had softened the outside.
This biscotti is made without any butter or oils in the tacky dough, making for an extremly crisp and crunchy cookie. Softer versions with added fat do have their place, but I tend to reach for this kind. I'm not really one for dunking, but I could see the aromatic cardamom in these pairing well with your favorite brew, tea or maybe even a cup of decadent hot chocolate. If you wanted to go all fancy, I think a dip or drizzle of melted white chocolate would be fun - dark chocolate may be a bit overpowering here. Lovely by their mildly-spiced selves, we did find them particularly enjoyable crumbled over a bowl of vanilla bean ice cream!
Back to my comment about Jeff's surgery. Some people knew, but most reading this probably didn't. He had surgery last Friday to replace a disc in his neck (anterior cervical discectomy and fusion to be specific) - we stayed at the hospital for a night and came home Saturday. The surgery was successful and he is spending most of his time resting to heal - it will take 3 to 6 weeks for it to settle down and he is given clearance to go back to work. Since they went in through the front of his neck for this type of surgery (I'll spare you his wound picture... he is having fun showing it off - be aware if you click that!), he is restricted to soft foods and liquids. Posts may be fairly slow until he has his appetite back and can eat as usual.
If we're not back to posting before the holiday hits, Merry Christmas!
Let It Dough
Creation of many things ... amusingly illustrated using cookie dough and sprinkles ... from the NY Times. Brilliant!
Many thanks to Mom for the heads up on this one!
Advent Calendar Day 20 - Religious Services
Prompt for December 20 – Religious Services
Did your family attend religious services during the Christmas season? What were the customs and traditions involved?
We generally did not attend church when I was growing up and we still do not. That being said, we periodically attended Christmas Eve midnight services until I was about 8 years old or so. I do not remember much about the services other than getting to stay up later than usual and hoping to get a glimpse of Santa Claus on the way home. He had never eaten the cookies I had left out or left any presents before we got back...
© 2010, copyright William C. Haskell
No Croutons Required - Festive Photos for December
The theme this month for No Croutons Required was to come up with a festive photo. It has become a tradition to deviate from our usual practice of asking for vegetarian soups or salads as December is a busy time of year and it's fun to share images of winter landscapes and Christmas preparations. There are some talented photographers out there and I am excited to see the submissions. I am not much for decorating my home for Christmas, and I hoped to send in a picture of a Christmas treat to Jackie, but the deadline for submissions is today, so I am sending along this picture from a few weeks ago when we were hit with nearly 4 feet of snow in a matter of days.
I will be hosting the next edition of No Croutons Required. Check back at the beginning of January for the challenge.
Weekend Herb Blogging #264 - Recap
It's hard to believe that we've almost come to the end of 2010 but we can see it off with the last Weekend Herb Blogging for the year.
Naturally there's a festive feel to this week's recap and I'm sure you'll find something to suit your tastes - be it sweet, savoury or something to sip.
As usual I've presented the entries in order of their main ingredient.
Almond
Almond Thumbprint Cookies with Fruit Preserves
by Yasmeen from Health Nut
Sticking with healthier options during the holiday season doesn't have to mean going without. Yasmeen has created a fabulous adaptation of those traditional thumbprint cookies - she uses a mix of whole wheat flour, almond meal and all purpose flour as well as pure cane sugar.
Apple
Apple and Date Brioche
by Anh from A Food Lover's Journey
I think Anh describes this best "The fruits are thinly sliced, tossed through some lemon juice and baked on a lovely buttery golden brioche. I adore this combination – fruity and buttery." I especially like that the brioche dough can be left overnight in the fridge - I can see fruity brioche for morning tea in my future!
Beetroot
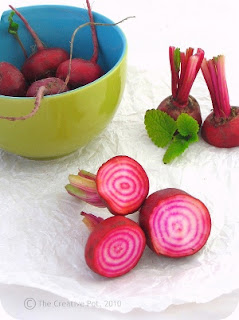
Candy Striped Beetroot, Avocado and Olive Salad
by Marisa from The Creative Pot
When you manage to come across these candy stripped beetroot, you want to ensure that their full beauty is on show and Marisa's dish certainly satisfies that requirement. The beetroot are first sliced thinly and then lightly baked. When cool, they are joined by avocado, black olives, fragrant mint and lemon balm and tossed in a simple dressing made with lemon juice and olive oil.
Black Fungus/Wood Ear Fungus
Chicken with Black Fungus
by Annie and Nate from House of Annie
Black (wood ear) fungus does have quite a unique appearance and texture and it can sometimes leave you scratching your head trying to work out how best to use it. Thankfully, Nate and Annie have a great recipe for us to try. Chicken pieces are first marinated in a mix of grated ginger and its juice. Garlic is quickly stir-fried and then the chicken is added and cooked until browned. Black fungus and Chinese wine follow and after a little simmer, it's finished off with green onions.
Chipotle
Goat Cheese Squares with Raspberry Chipotle Chutney and Cilantro
by Victoria from Flavours of the Sun
Victoria is bringing us a touch of spice from Mexico in the form of chipotle chiles. This colourful chutney combines garlic, onion, red bell pepper, honey, ginger, chipotle chilies in adobo sauce and raspberries and once cooled extra raspberries and cilantro is added. Victoria uses it to top a simple goat cheese tart. Red, Green and Perfect for Christmas - I think it is!
Chocolate/Cocoa
Homemade Chocolate Mix
by Cinzia from Cindystar
We can always count of Cinzia to make the most fabulous edible gifts and this week is no exception. Cinzia shows us how simple it is to make our own Hot Chocolate mix complete with suggestions on how to make flavoured versions. There will be no excuse to buy the commercial blends any longer.
Cocoa
Spiral Cookies
by Brii from Briiblog
Brii continues her families cooking making tradition with these beautiful Spiral Cookies. You must have a look at her post and in particular the photo of the cookie making session - I've never seen a table so full of cookies before.
Guava
Guava Cobbler
by Claudia from Honey From Rock
I always thought that the only use for guava was as a drink, ie guava juice but Claudia has opened my eyes to the potential of this tropical fruit. She's made a guava cobbler - sliced guava is first cooked in a mixture of sugar, butter and flour until softened. The cobbler topping has a tropical feel too as it uses coconut milk.
Key Lime
Key Lime Meltaways
by Janet from Taste Space
Another fabulous cookie for the holiday table - a buttery, melt in your mouth type with hints of tart lime. Janet uses both the zest and the juice from Key Limes in these cookies. Once the cookies are baked and still warm they are tossed in a sugar filled bag - I just love that idea! Janet says they will last in an airtight container for 2 weeks, I don't think they would survive 2 hours in this house.
Pears
Hibiscus Tea Poached Pears
I've used hibiscus tea to help colour these poached pears.
Sweet Potato
Vegan Pate with Sweet Potato
by Johanna from Green Gourmet Giraffe
It is the season for entertaining and Johanna shares with us a pate that isn't just vegan, it's also gluten free! Johanna combines sweet potato, onion, garlic, tamari, ground sunflower & linseeds, nutritional yeast and thyme to create a puree which is then baked. The leftovers also make excellent sandwich fillings.
Thyme
Thyme Passionfruit Green Tea
by Min from Honest Vanilla
Min has created this special tea for her mum and luckily for us we can enjoy it too! If I close my eyes I can imagine that the combined aromas of passionfruit and thyme must be utterly intoxicating.
If I've made any errors or left anyone out, please drop me a line and I'll fix it right up.
Thanks again to everyone who joined in this week and to everyone who has taken part throughout the year. Weekend Herb Blogging officially restarts January 3rd however I will be accepting entries posted during the break - just send them along to whb AT cookalmostanything DOT com.
I hope you all have a wonderful Christmas and a fabulous New Year and I look forward to the start of another great year of Weekend Herb Blogging in 2011.
All Rights Reserved ©Haalo. For personal non-commercial use only - this feed may not be republished.
Subscribe to:
Posts (Atom)